"What a refreshingly honest blog about listening to music through hi-fi. So happy to see views based upon the enjoyment of music rather than so-called sound 'quality'." - Peter Comeau, Director of Acoustic Design at Mission / Wharfedale

Friday 19 June 2015

"Portable" Project Part Four - Up And Running

Part One is here

Part Two is here

Part Three here

Now to focus on the speaker chambers.

Another bit of online shopping snagged some self-adhesive sheets of sound deadening for £8 to help with damping the panels - I used these on all the speaker chamber surfaces that had room for them.  I also used a set of 4x 40mm Polipod feet underneath to both raise the box up to allow airflow, and to try and stop energy going into the surface on which the box is going to stand - typically this will be a table and they're horrible when they start vibrating along with music.  The Polipods were drilled and screwed to the underside.

The mid-bass drivers are fitted on the front and the rear with rubber sealing rings, the tweeters aren't. So the drivers were installed into the cabinet (pilot holes being drilled first for the screws), then sealed with clear silicon sealant from inside the cabinet.  Speaker cables from the crossovers are soldered onto the drivers.  The anti-vibration sheets were then cut to size and stuck onto the relevant panels.  Cables were then p-clipped into position and sealant applied to where the cables enter the speaker chamber.

Speaker chamber completed, damping panels in place.  Note the hinged lid
The plan was for the hinged top lid to create a seal to ensure that the speaker chambers were properly sealed to ensure they acted as infinite baffle enclosures. There's a clamp on the box lid, but the wood just isn't flat enough to provide a seal.  A quick search around the garage and an old 700C cycle inner tube was pressed into action.  Halved lengthways, cut to length and stapled onto the box, they provided an excellent seal - the natural curve of the halved inner tube spreading under pressure and completing the seal.  Now, with the box lid closed, pushing gently on one of the mid-bass drivers forces the other mid-bass driver to move in the opposite direction - a sign of a good seal.

Playing some tunes from the FiiO portable FLAC player produced a fairly light, boomy kind of sound - pretty much as you might expect when just looking at the completed box. Another quick Google search reveals that most infinite baffle speakers use polyester as a filling material - just like many a low cost pillow, of which there were a few old ones lying around in the garage - good protective packing when moving stuff around in the boot of the car. One was opened up and the polyester filling teased out (wearing a breathing mask and rubber gloves for this) and each speaker chamber filled with half of the content of one pillow.

FiiO X3 FLAC player used as a source during testing


Well, this was not a small nor subtle change - more bass, more control, but still boxy.  Another pillow was sacrificed and another improvement noted. A third pillow was pressed into service, and it took a bit of compressing to get this material into the chambers.  But this was very successful - providing much deeper and more controlled bass, with much much less boxiness. So the less than scientific approach of trying different options gave a good final position.

Each speaker chamber stuffed with the content of 1.5 polyester pillows

And that was that. One ex-Austrian army ammo box pressed into a new lease of life.  One extremely solid (read very heavy), sort of portable, sort of Linn, sort of Mission, sort of dock.  Which pays music. Very much better than expected.

A very pleasing result, and one that has a nod to its Linn heritage through the use of the "Krate" die-cut stickers (another £5) and the XL label as it's pretty big!

Constructed from an ex-Austrian Army ammo box.  Very solid pine and ply panels, heavy duty rope handles, robust hinges - you get the picture

Shiny volume knob is the only concession to any kind of quality look

Playing tunes on the dining table.  It sounds better than it looks!  Linn silver interconnects in use at this point.

"Portable" Project Part Three

Part One is here

Part Two is here

So we have a box, some vents, and amp and some crossovers.

Next up was cutting and fitting of the connections panel.  This covers a pair of RCA phono inputs, a combined mains socket / fuse / switch and a USB port for charging.  This was cut from a small black perspex panel, drilled to fit etc.

The full sheel of perspex with the appropriate holes drilled, but before cutting.  It has protective sheets on both sides

All the holes drilled, cut to size and slots cut to fit all the necessary bits

Soldering the input cables to the RCA phono sockets for the connection panel
The panel was then fitted with all its parts and then screwed into the main box.  No sealant necessary as the centre amp chamber is ventilated anyway.

This will be the outside, once installed

Connection panel all cabled up


Installed and cabled up - here both the inlet and outlet vent holes can be seen, and the 3 holes through to one of the speaker chambers

The white plug is actually the USB charger - the cable running over the top and then into the USB connection on the connector panel
Here the crossover, power amp, speaker cables, input cables, volume control, connection panel, mains sockets and USB charger are all in place, as is the rear panel warm air vent.  Output speaker cables not yet silicon sealed into place.  Note Linn black interconnects and bi-wiring of amp to speaker crossovers (the crossovers require bi-wiring as that's how the Mission 773e rear connections were arranged)
Part Four is here

"Portable" Project Part Two

Part One is here.

Using hole cutters on the drill, holes were cut for the drivers in the front panel, and some repair work was done to the wood as a result of my handiwork (PVA glue is a good thing).  Positioning the drivers was decided by putting the tweeters as far apart as possible, the need to squeeze 2 mid-bass drivers per side in the space available and the position of the hinges for the lid of the box.  Some suprisingly long and substantial nails were found in the panels by the hole cutters, which quickly went blunt, so won't be any use for future projects.  Ho-hum.

Fitting the crossovers, amp, cables etc. into the space available wasn't too bad, but sequencing what to when was pretty key.  I also used 5mm p-clips to keep stuff tidy.  Wherever possible, connections were soldered and covered by heatshrink can cables p-clipped to the inside of the box.  Bi-wiring was used from the back of the amp to the crossover boards, as that was just as easy as it would've been to re-bridge the connections on the crossover itsself.

Crossovers mounted on the insider of the front panel - the hole lower down is for the ALPS pot volume control

Crossovers are on small plastic "stand offs".  The multi-coloured cables pass from this central amplifier space, through the 18mm dividers into the speaker cabinet spaces.  The gold coloured cables will go to the amp

Wiring up the volume pot was straightforward, using a wiring diagram found using Google.  It uses Linn black analogue cables from the input panel and then onwards to the amp.


Part Three is here

"Portable" Project Part One

Look back far enough in the blog and you'll find a bit of nonsense that resulted in a cardboard portable iPod dock using a T-amp and Linn in-ceiling speakers.

It filled a few hours and, although it worked, it sounded pretty rubbish, as might be expectd.  Within a week the taped seams had fallen apart and all the bits were back in their boxes.  So that was that and here is the result, plus the early ideas about building something more substantial, that also came to absolutely nothing, except that the speaker drivers were still around in the garage:  Sneeker Part 2

Although this post and the next 2 parts are being written in the early Summer in the UK, it actually relates back to a project that ran from time to time over the Winter of 2014/2015, I just haven't had time to write it all up.  The actual result made a début in the bar at the 2015 Hifi Wigwam Show at Scalford Hall in Melton Mowbray - providing background music on Saturday evening.

So here are the first parts (the drivers) and thoughts about how to make something more substantial, more Linn and hopefully tolerable to listen to:


Drivers
I thought it through and decided I wanted:

Standard RCA / Phono inputs so it could connect to pretty much any source
Mains powered - batteries are too restrictive
USB charging port to keep iPod or whatever going
Decent volume capability and therefore a proper power amp
Use the drivers already "in stock"
Room to add a Raspberry pi streamer later
Analogue volume control
A "robust" look
Low low cost

Here were the bits I had lying around in the garage that would suit:
4x Mission 100mm mid-bass drivers (see pic above)
Mission tweeters from 773e
Bits of wire
Mains cables
Mission 773e crossovers
T-Amp (which actually went elsewhere before work started, thankfully!)
Bits of wood and wood sheets

So much searching was done on ebay, and I discovered that Linn RoomAmps (from the Knekt multi-room system) sell for very small amounts of money.  I also found that older Linn tweeters sell for a reasonable price too, and ALPs volume controls are cheap, if you can wait for them to arrive from China.

So, the following was assembled:

Linn RoomAmp (£27)
ALPs 10k stereo pot (£12)
USB charger (£3)
Mains switch and socket (£4)
Pair of Linn Index tweeters (£17)
USB socket (£5)
USB cable (£2)
Small black perspex sheet (£3)
z speaker plugs (£7)
Vivarium airvents (£3)

Originally I intended to build a box to put it all into, but my woodworking skills are a bit rubbish, to be honest, so more ebay searching for wood boxes found me something suitable - solid, the right kind of size, and very much fitting in with the "robust" theme.  The box added another £15 to the parts cost.

Some experimenting on the bench with the drivers fitting into a cardboard shoebox indicated that the crossovers worked well with the drivers, and that the RoomAmp was healthy enough, so wood cutting and metal bending started.


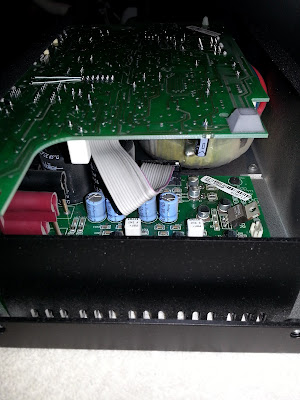
Inside the Linn RoomAmp
The RoomAmp is essentially a simple 20-25W per channel power amp - designed to be fitted into cupboards, loft spaces etc.  It has a Knekt proprietary input, a pair of RCA phono outputs and BFA set of speaker outputs.  For the purposes of this project, the "output" phono sockets are used as the inputs - no changes necessary to do this, they're just directly connected to where the Knekt signal has be separated out to go into the power amp, so its simple enough.

The amp has a bent metal sleeve that has overhangs along the long edges.  I removed the sleeve, removed the fillets at the ends with a bit of sawing and power filing (power files - if you don't have one, get one, they're magical!), the overhangs were then bent at 90 degrees to the top panel, forming a lip that could be used for mounting the amp vertically inside the player.  A bit of matt black spray paint was added to prevent rusting.  After fitting the sleeve back onto the amp then a trial fit showed that it worked well inside the box.

Positioning the amp inside the box allowed measurement of where the dividers could be fitted to form the speaker cabinets, where the crossovers could be mounted, how to position the connections panel and where to cut holes for vents.  Holes were then cut for the vents - one in the base to allow cool air in, one in the back to let warm air out, and the vivarium vents were glued in.  The hole was then cut for the connections panel and the 18mm marine ply dividers were cut and fitted, after holes had been drilled to allow the 3 pairs of speaker cables into the speaker cabinet spaces.  At this point all the internal joints were sealed with clear silicon sealant.

Lower cool air inlet vent, one of the divider panels (on the left) and 2 exmaples of how poor my woodworking skills are - good job this is all on the inside

Sealing all the joints with clear silicon sealant

Gluing the lower vent in place
Part Two is here